Save time by using IIS instead of Cassini
I’m always looking for ways (whether or big or small) to make the software development process faster, and here’s a real easy win — use IIS instead of Cassini. Cassini was a good idea in concept (allows you to develop web applications without IIS), but it’s also really slow. If you’ve used it, you know what I’m talking about — every time you debug your application, you have to wait 20 seconds for Cassini to start up. Fortunately there is a better way, and that way is to use IIS instead.
The first thing is that you need to be developing a web application, not a web site. I can’t think of any reason to use a web site over a web application. So I’m going to assume that you already have a web application. I’m also using IIS 7. If you’re using IIS 6, you can still do all of the same things, but you have a different IIS console. But you should still be able to figure it out.
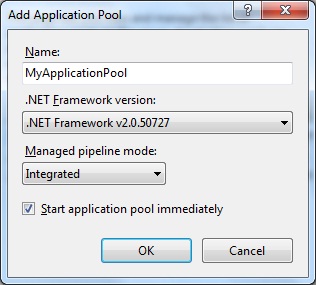
Step 1: Create a new application pool by right-clicking on “Application Pools” in the IIS management console. I suppose you could use an existing application pool, but I always like to make a new one. This way, you don’t have one application pool being used for multiple sites, because then you can’t change the application pool settings without affecting all of those sites. After you create the new application pool, click Start in the panel on the right to start the app pool.

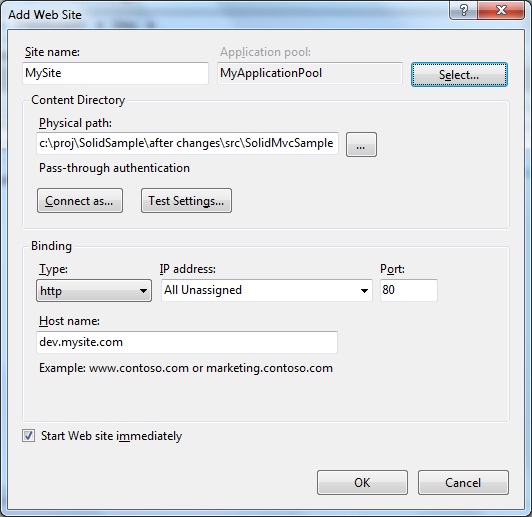
Step 2: Right click on “Sites” in the IIS management console and select Add New Site. The physical path should be the local path on your drive to the folder that contains the web.config file for your site. In the “Host name” text box, just make up some host name. For example, “dev.mysite.com”. It doesn’t matter what you pick, just pick a host name that doesn’t actually exist. Also, click the “Select” button at the top and select your application pool.

Step 3: Edit your “hosts” file. This file can be found at C:\Windows\System32\drivers\etc\hosts. Enter this line at the bottom of the file:
127.0.0.1 dev.mysite.com
Use the host name that you entered when you created the new web site.
Step 4: Browse to the URL that you assigned to the site. In my case, http://dev.mysite.com. Your website should come up! Win!
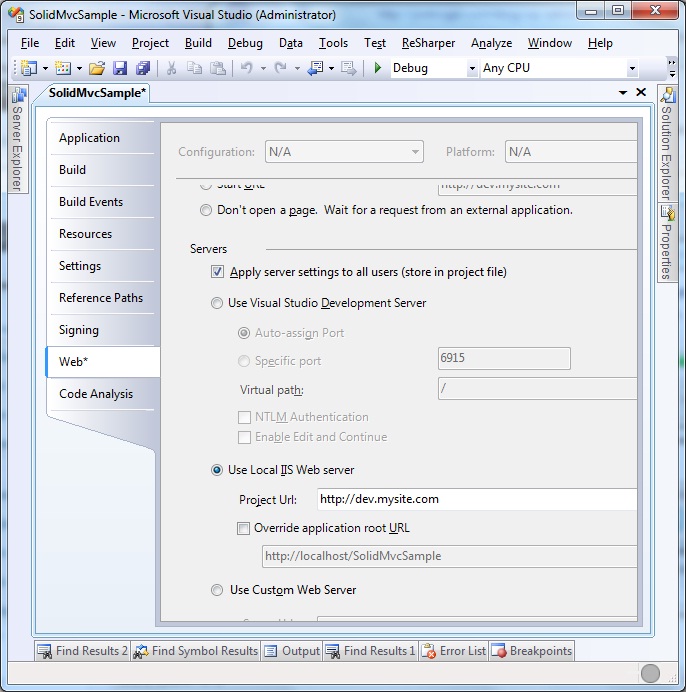
Debugging your site using IIS is slightly different. In Visual Studio, edit the project properties for your web site and select the Web tab. Click on the “Use Local IIS Web Server” radio button and enter your custom URL as the Project Url (e.g. http://dev.mysite.com). Notice that there is also a checkbox that says, “Apply server settings to all users”. Ideally everyone on your team will set up IIS (because this way is much faster), but if that is not the case, you will want to uncheck that checkbox.

You can also debug your site by doing Tools / Attach to Process in Visual Studio (that’s Ctrl-Alt-P) and connecting to the w3wp.exe process (aspnet_wp.exe if you’re on Windows XP). If you don’t see w3wp.exe in the list, make sure that you check the “Show processes in all sessions” checkbox in the Attach to Process dialog box.
Happy debugging!


Great stuff, Jon. I typically use a manually-configured IIS instance to run the larger apps I work with, but I wasn’t aware you could plug it right in to the project. Slick!
Interestingly, I didn’t have to configure the “attach to process” section to successfully debug into the project. Maybe that’s a feature of VS 2008 running on Win 7/IIS 7.
This is usually the first thing I do after checking out my new branch – good tip.
I’ve also had luck with that “create virtual directory” button that’s just to the right of the “Project Url” field in your screen shot. As long as the url you enter in that field isn’t already taken, I’ve never had a problem with letting Visual Studio create it all for me – saves from having to manually set it up in IIS manager.
If you are using Win 7’s IIS you might need the following link to allow your site the permissions to run.
http://blog.donnfelker.com/post/IIS-7-This-configuration-section-cannot-be-used-at-this-path.aspx
On Win 7 don’t forget to check Asp.Net under IIS’s Application Development Features. Maybe that would have fixed the problem I solved above?
Jon, love this – Not only is cassini slow but it would not render the page correctly so I was continually deploying to a local server to test. :-(
Good points, I do want to mention that this requires slightly more up front work:
Consider following situations:
1. Once I pull down the code from source control, I can not just hit F5 and start debugging application.
2. I cannot run multiple instances of the code. for example, what if I have 2 or more branches of the application code, then for each instance of the application I will have to create a dedicated IIS site.
3. It does require for the developer to have administrative rights on machine to administer IIS and have IIS installed in the first place.
with that said I do prefer IIS over Cassini, when I have a choice. :)
@Alexei,
This does require more up front work, but you get that time back really quickly since you’re not waiting on Cassini all the time!
>> I can’t think of any reason to use a web site over a web application.
How about “Because the 500k lines of code production system was developed when it was ‘the way’, and attempts at running the conversion process fail”?
Though, we did manage to hack something to make the converter work, and dehack after conversion, finally. Suboptimal, but hopefully functional.
Thanks a lot, you have solved a lot big prob f mine…
God Bless u…