Unit Testing JavaScript – Test Driven Development in action!
So far I’ve talked about JavaScript basics, JavaScript test frameworks, and writing testable code. Now for the real fun… let’s do some test driven development!
I know that TDD seems somewhat backwards to a lot of people, and it’s hard to undo the years and years of not writing tests. I learned from watching people doing it and learning the thought process and reprogramming my head so that I could think in a new way. So hopefully this will help you understand the thought process.
Step 1 – Get your requirements
So you’re about to start on a new feature or fix a bug. Either way, you will get requirements in some form.
In this case, we want to create a greatly slimmed down version of Sudoku. Here are the rules:
- The puzzle will have only 4 boxes in a 2×2 grid.
- You can enter numbers 1 through 4 in a box by selecting a box and pressing the number keys on the keyboard
- Selecting a box and hitting the Delete key should remove the value in the box
- You can change the numbers or remove the numbers at any time
- Give the user a button to click that will check to see if the puzzle is valid
- Give the user a button that will give the user a new puzzle. A new puzzle will have 2 of the numbers already filled out.
- A puzzle is valid if:
- Each box has a number 1 through 4
- Each box has a different number
OK, so what do you do now? Most people would start hammering out some JavaScript classes. But we’re not going to do that, because we’re not done with the design phase yet.
What do I mean by that? Well, one of the big reasons that we write tests first is to help us design our code. Sure, you could write tests after you write the actual code. But if you do it that way, you will spend lots of time refactoring code (that you don’t have tests around yet) in order to make it testable. That’s wasted time, so we’ll do our design up front by outlining our tests, writing the tests, and then writing the code.
Step 2 – Refine the requirements
Let’s look at the first bullet point in our requirements:
The puzzle will have only 4 boxes in a 2×2 grid.
Business requirements aren’t always written out as individual acceptance criteria, so let’s split this line into individual requirements and write them out.
- The puzzle should have 4 boxes
- The boxes should be in a 2×2 grid
Step 3 – Write out the test methods
Now that we have that, let’s translate that into tests:
describe('When creating a new Puzzle',

{

    'The Puzzle should have 4 Boxes': function()

    {

    }
'The boxes should be in a 2x2 grid': function()
{
}
});
Step 4 – Stub out implementation classes
Now we have two tests. These tests will help us design our code. Let’s see what we can learn from these tests:
- We need a Puzzle object
- We need a Box object
- The Puzzle should have a collection of Boxes
- We need a way to ask the Puzzle for a box at a given coordinate in the grid
Let’s write these classes and methods, but we won’t implement the methods yet.
function Puzzle()

{

    var boxes = new Array();
this.getAllBoxes = function()
{
}
this.getBox = function(columnIndex, rowIndex)
{
}
}
function Box(columnIndex, rowIndex)
{
this.getColumnIndex = function()
{
return columnIndex;
}
this.getRowIndex = function()
{
return rowIndex;
}
}
Step 5 – Write test code
Now that we have our objects, we can write the code inside our test methods (I’m using JSSpec as my testing framework):
describe('When creating a new Puzzle',

{

    before_each: function()

    {

        puzzle = new Puzzle();

    },
'The Puzzle should have 4 Boxes': function()
{
value_of(puzzle.getAllBoxes().length).should_be(4);
},
'The boxes should be in a 2x2 grid': function()
{
for (var columnIndex = 0; columnIndex < 2; columnIndex++)
{
for (var rowIndex = 0; rowIndex < 2; rowIndex++)
{
var box = puzzle.getBox(columnIndex, rowIndex);
value_of(box.getColumnIndex()).should_be(columnIndex);
value_of(box.getRowIndex()).should_be(rowIndex);
}
}
}
});
We've written our tests. Now let's run them and watch them fail. The reason we do this is because if these tests pass now, then they're probably not written correctly and we don't want false positives.
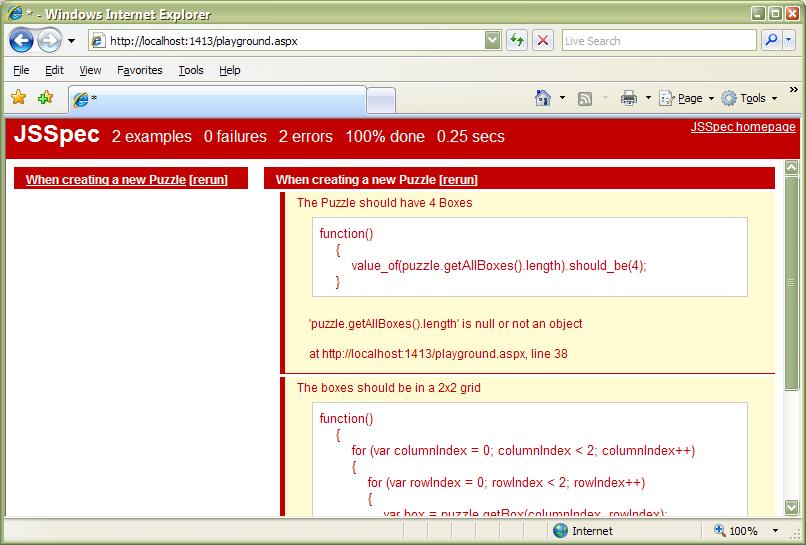
Yep, they're failing, just as I expected.
Step 6 - Write implementation code
Now, yes now, you finally can write your implementation code. I know that some of you have been chomping at the bit to get to this point. So here we go.
function Puzzle()

{

    var boxes = new Array();
for (var columnIndex = 0; columnIndex < 2; columnIndex++) { for (var rowIndex = 0; rowIndex < 2; rowIndex++) { var box = new Box(columnIndex, rowIndex); if (boxes[columnIndex] == undefined) boxes[columnIndex] = new Array(); boxes[columnIndex][rowIndex] = box; } } this.getAllBoxes = function() { var list = new Array(); for (var column = 0; column < boxes.length; column++) { for (var row = 0; row < boxes[column].length; row++) list.push(boxes[column][row]); } return list; } this.getBox = function(columnIndex, rowIndex) { return boxes[columnIndex][rowIndex]; } } function Box(columnIndex, rowIndex) { this.getColumnIndex = function() { return columnIndex; } this.getRowIndex = function() { return rowIndex; } }
Let's run the tests and see if the code works.
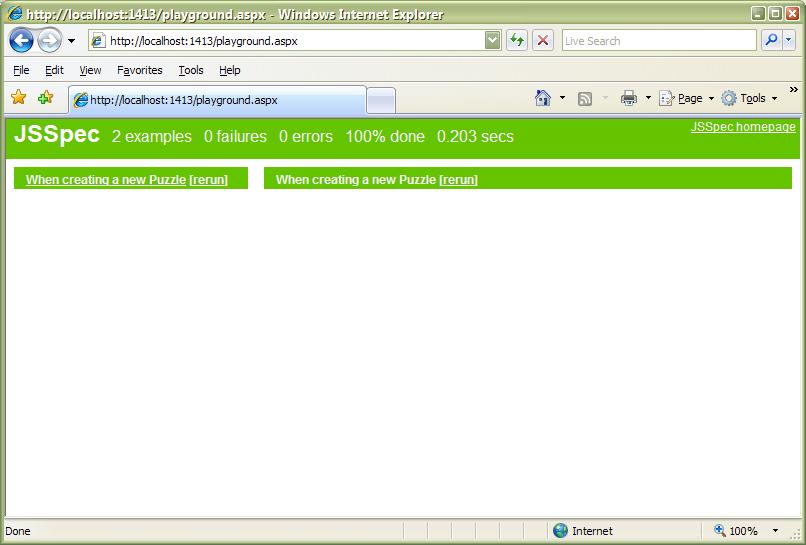
Sweet goodness. But I've only implemented one of the requirements. No problem, I'll just go back to step 1 again and go through the process with the next requirement and repeat until I'm done with all of the requirements.
Let's take a look at what we have now.
- We have code that we know is working correctly
- We have tests to prove that the code is working correctly, both now and from now on
- We have tests that describe what the code is supposed to do. Our tests are documenting our code!
- We have well designed classes
- Our classes do only what they're supposed to do -- we didn't waste time writing things that we don't need
- We have peace of mind!!
Let me talk about this peace of mind. This is something that I can describe to you but you can't understand it until you experience it. I am 99% sure that the code that I wrote is working now and will continue to work in the future. I can refactor my code or make changes and I know that it will be working correctly when I'm done. I can guarantee you that the only way that my code has bugs is if there is some requirement that I didn't know about. Can you say that about your code?
What happens when it's a day or two before you put something into production and they find a nasty bug that absolutely has to be fixed before you go live? (Certainly not the ideal situation, but it happens all the time.) Wouldn't you love to have a suite of tests to run so that you can be less likely to break something else when you fix the bug? (And remember, bugs are much more costly and difficult to fix when they're in production.)
Have you ever been in that endless cycle of fixing a bug only to break something else, and then when you fix that bug you break something else, and on an on?
This is why I write tests. And this is why I will never go back.
How to get started with TDD
People ask me how to get started doing TDD. The best way is to just do it. The next time you have a simple feature or a simple bug to fix, write your tests first. It takes awhile to get into the mindset, but once you do it a few times it starts to make a lot more sense. If you know someone else who is good at TDD, testing, mocking, etc., pair program with them for a day and watch how they work. You'll need to get better at separation of concerns, programming to interfaces, and the like. Maybe that will be my next post. :)
Completed sample project
I went through the entire exercise with the MiniSudoku project. You can download the finished product here. (UPDATE 2/25/09: this link contains examples using both JSSpec and QUnit.)
Good luck!
